What is Genome Browser in a Box?
Genome Browser in a Box (GBiB) is a "virtual machine" of the entire UCSC Genome Browser website that is designed to run on most PCs (Windows, Mac OSX or Linux). GBiB allows you to access much of the UCSC Genome Browser's functionality from the comfort of your own computer. It is particularly directed at individuals who want to use the Genome Browser toolset to view protected data. If it is not human sequencing reads, it usually does not fall under medical data privacy rules, and you should most likely not use GBiB but rather assembly hubs or track hubs. See our mirror page for adiscussion of the advantages/disadvantages of the different methods to customize your genome data display.
Differences between GBiB and the Genome Browser
While GBiB and the Genome Browser are similar in many ways, there are key differences. In particular, GBiB makes it much easier to visualize sensitive or protected data. Prior to the introduction of GBiB, it was necessary to upload your data to the UCSC Genome Browser website or place the data files on a publicly accessible web server and supply the URL to UCSC in order to view your own data with the Genome Browser. GBiB removes these requirements: none of your data must be uploaded to the UCSC servers, allowing you to use the Genome Browser on personal datasets in situations where it's infeasible to load the data onto a public web server.
Rather than installing the entire UCSC genome annotation database (several terabytes of data), GBiB instead depends upon remote connections to various UCSC servers for much of its functionality and data. It connects to the UCSC download server to obtain genomic sequences, liftOver files, and many of the other large data files, and connects to one of UCSC's public MySQL servers to download data displayed by the various annotation tracks. A few Genome Browser tracks are unavailable on the UCSC public MySQL servers due to agreements with the data distributors (DECIPHER and LOVD Variants), and thus are unavailable for use with GBiB.
The majority of protected data use in the research community currently focuses on the human genomes, primarily the hg19 (GRCh37) assembly and with a growing body of annotation on the newer hg38 (GRCh38) assembly. As a result, GBiB is currently optimized for use with the hg19 assembly. Many other recent genome assemblies can also be viewed, but access may be slower than for optimized assemblies. Access speed may also be impacted by your connection distance from the UCSC server. To improve performance in these situations, GBiB includes a simple tool that allows you to download ("mirror") selected genome annotation tracks to your machine. You can find more information about this tool in the Improving Speed and Performance section.
For more background on GBiB see:
Haeussler M, Raney BJ, Hinrichs AS, Clawson H, Zweig AS, Karolchik D, Casper J, Speir ML, Haussler D, Kent WJ. Navigating protected genomics data with UCSC Genome Browser in a Box. Bioinformatics. 2015 Mar 1;31(5):764-6. PMID: 25348212; PMC: PMC4341066
Getting Started: Setting up Genome Browser in a Box
System requirements
GBiB will run on most modern PCs and major operating systems that meet these basic requirements:
- The computer must support virtualization (common for most PCs sold after 2010).
- A compatible version of the VirtualBox software (version 4.3.6 or higher) must be installed. This software is free to use in many situations. See the VirtualBox wiki for licensing terms and conditions and installation instructions. You must have administrator privileges to install VirtualBox on your computer.
- The computer hard disk must have at least 20 GB of free space (more if you plan to mirror many tracks).
-
Your network firewall must allow outgoing connections to the following servers and ports:
- MySQL connections, used to load tracks not local to your computer:
- US server: Port 3306 on genome-mysql.soe.ucsc.edu (128.114.119.174)
- European server: Port 3306 on genome-euro-mysql.soe.ucsc.edu (129.70.40.120)
- Rsync, used to download track data:
- US server: TCP port 873 on hgdownload.soe.ucsc.edu (128.114.119.163)
- European server: TCP port 873 on hgdownload-euro.soe.ucsc.edu (129.70.40.99)
- Download HTML descriptions on the fly:
- US server: TCP port 80 on hgdownload.soe.ucsc.edu (128.114.119.163)
- European server: TCP port 80 on hgdownload-euro.soe.ucsc.edu (129.70.40.99)
- MySQL connections, used to load tracks not local to your computer:
Installation
- Confirm that your system meets the above requirements.
- Download GBiB from the Genome Browser store (see Licensing Information). Due to the large size of the gbib.zip product file, the download time may range from 30 minutes to a few hours depending on your Internet connection speed and distance from UCSC.
- Extract the contents of the gbib.zip file (three files). If desired, the extracted files can be moved to a different directory on your computer, as long as all three files reside in the same directory and are not renamed. Extraction notes: On OSX, do not use the command line tool "unzip" to extract the files; instead double-click on the gbib.zip file in the Finder window. On Windows, you must use a third-party tool such as 7zip or WinRAR to extract the gbib.zip contents, as the file size exceeds the capabilities of the standard Windows extraction tool.
-
Add GBiB to VirtualBox:
- Double-click on the browserbox.vbox file extracted from gbib.zip OR
-
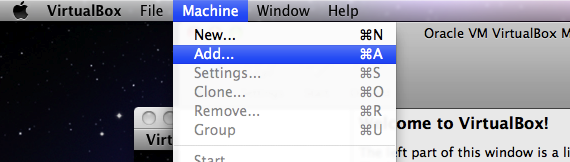
Start VirtualBox, select Machine >> Add, and open the file
browserbox.vbox.
If VirtualBox or the Genome Browser displays an error message during the installation process, consult the Troubleshooting section.
Starting and using Genome Browser in a Box
Starting GBiB
To start using GBiB with VirtualBox:
- Start VirtualBox.
- Select "browserbox" on the VirtualBox left-hand menu (see "Getting Started" to add GBiB to VirtualBox).
-
Click the "Start" button in the VirtualBox toolbar.
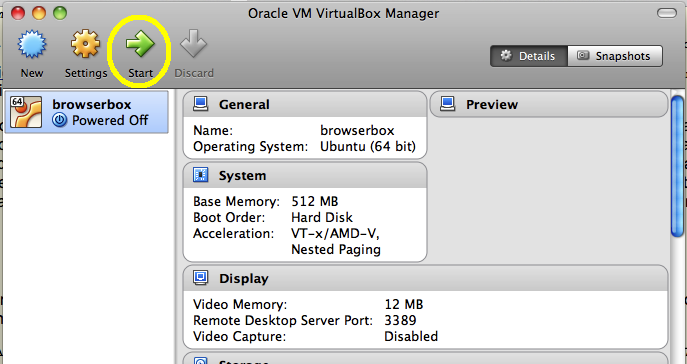
This will open a black GBiB terminal window with a Linux command line interface:
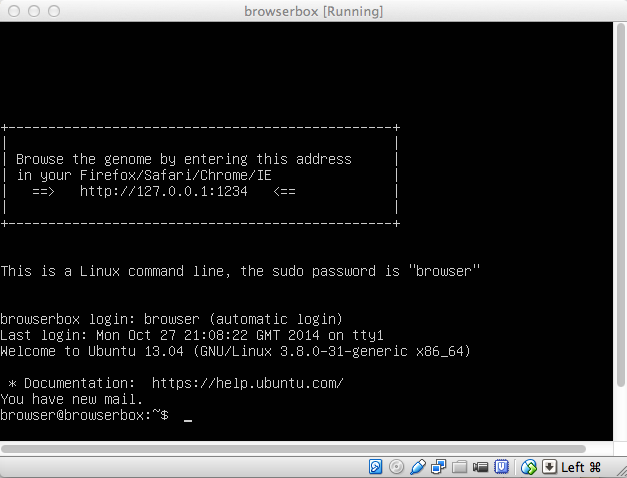
In most cases, GBiB will auto-update itself after starting for the first time. This update will often include database tables for RefSeq Genes and other tables that are frequently updated at UCSC. The auto-update may take several minutes to complete and the progress will be shown in the terminal window. - Open an Internet browser window to 127.0.0.1:1234. We recommend using this URL instead of http://localhost:1234, because most Internet browsers do not send cookies to "http://localhost", which are required to save your browser configuration between sessions. You may want to bookmark 127.0.0.1:1234 for quick future access.
If you have correctly set up GBiB, your Internet browser should display the Genome Browser home page. From this page, you can start using GBiB as you would the public Genome Browser website. Consult the UCSC Genome Browser User's Guide for introductory information on using the Genome Browser tools.
Stopping GBiB
To shut down the GBiB machine (for example, to change configuration options):
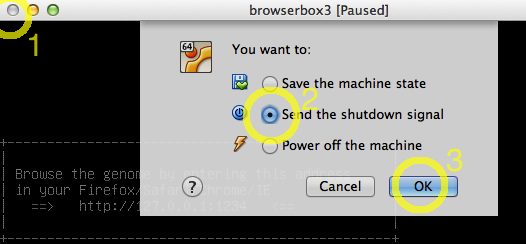
- Close the GBiB terminal window.
- Select "Send the shutdown signal".
-
Confirm by clicking "OK".
Improving speed and performance
Under certain circumstances the speed and response time of GBiB may be less than optimal. This section offers suggestions for improving the performance of your GBiB installation.
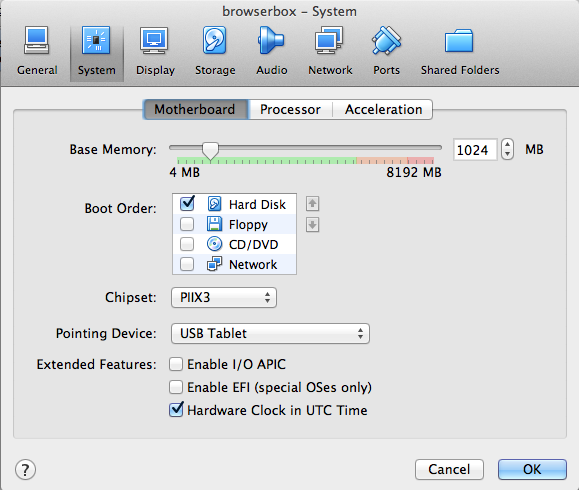
Increasing GBiB RAM
As a first measure for performance improvement, try increasing the amount of RAM that GBiB is allowed to use. By default, this limit is set to 1 GB (1024 MB). If your machine has enough RAM installed, you may want to increase the GBiB RAM to 2, 4, or even 8 GB. This will usually improve the system responsiveness. To increase the RAM limit:
- Shut down the GBiB machine (Stopping GBiB).
- On the VirtualBox Manager window, click Settings >> System.
-
Move the memory slider to the value of your choice, then click "OK".
Using the GBiB mirror tool
If your GBiB performance is still slow after increasing the RAM, you may be located too far from UCSC. The load time of default tracks ranges from a few seconds on the west coast of the United States to as much as 7 seconds from Europe. In this situation, you may want to use the GBiB mirror tool to download ("mirror") tracks to your machine, which will greatly increase the access speed for those tracks.
To use the mirror tool:
- Click Tools >> Mirror Tracks in the Genome Browser menu. The first time you open the mirror tool, this page may take a while to load.
- Select the tracks that you typically use by checking the boxes next to the track names.
- Click Download.
In addition to downloading entire track sets, you can also download individual subtracks. The file size of each track is listed next to the track name. If you are unsure of which tracks to select, we recommend the option Default tracks with conservation tables, but no alignments. When downloading large tracks, keep in mind that you cannot delete these tracks and the related data from GBiB once you have downloaded them. If you find that you've started downloading the wrong track or a track that is too large for your machine, you can cancel the download at any point by clicking Cancel Download Now.
Depending on your network bandwidth, the download can take several minutes or up to a few hours over a DSL line. During the download, the file gbib-data.vdi will grow in size, and you will not be able to use GBiB. Once the download is complete, the default tracks should load in less than three seconds for a typical genomic position.
If you are in your GBiB on the command-line you can use a direct rsync command for files of interest. For example, if you knew you wanted all the GENCODE tracks on hg19 you could run either of the two rsync commands for the North American or European hgdownload servers:
sudo rsync hgdownload.soe.ucsc.edu::mysql/hg19/wgEncodeGencode* /data/mysql/hg19/.
sudo rsync hgdownload-euro.soe.ucsc.edu::mysql/hg19/wgEncodeGencode* /data/mysql/hg19/.
The above commands will rsync all of the files at the UCSC hgdownload server in the hg19 assembly that start with wgEncodeGencode to your GBiB into the hg19 directory. There are some supporting files in a hgFixed directory, such as for the publication tracks, that could be mirrored with such commands.
You can also download gbdb files in this manner.
sudo rsync hgdownload.soe.ucsc.edu::gbdb/hg19/multiz100way/phyloP100way.wib /data/gbdb/hg19/multiz100way/.
sudo rsync hgdownload-euro.soe.ucsc.edu::gbdb/hg19/multiz100way/phyloP100way.wib /data/gbdb/hg19/multiz100way/.
The above command would copy the phyloP100way track to display in the GBiB from a local file.
Offline mode
GBiB has an offline mode that is particularly useful when you want to ensure that GBiB no longer
connects to the Internet once the initial download and setup are complete (for instance, to comply
with corporate IT policy). Before going offline, first mirror all the tracks that you will want to
access. Then, in the GBiB terminal window type the command: gbibOffline. This command
will remove GBiB's network access to the UCSC MySQL server and download servers.
Once GBiB is in offline mode, the Genome Browser will display an error message if you attempt to
access a data file not located on your local disk; therefore, we do not recommend this option for
general use. To reactivate Internet access, click on the GBiB terminal window and type the command:
gbibOnline.
Updating Genome Browser in a Box
The software that supports the UCSC Genome Browser is updated every three weeks. These updates include new features and bug fixes for existing features. The track data, on the other hand, are not updated on a regular basis. New tracks and updates to existing tracks are released as they pass UCSC's quality assurance process. The only exceptions to this are GenBank-based tracks, including RefSeq Genes, GenBank mRNAs, and others, which are updated weekly through an automatic process.
Automatic updates
By default, GBiB is configured to automatically update its files, including software and tracks that you have mirrored. The updates will not affect your custom tracks, user accounts or sessions. We recommend that you leave the auto-update process turned on if Internet connection speed is not an issue, to ensure that you receive all the latest software features and bug fixes, as well as updates to your mirrored tracks.
If you are using a DSL line, we recommend turning off automatic updates. Over a slow internet
connection, the GBiB update may take several hours to complete, during which time the software will
be unusable. To turn off the auto-update process, start GBiB, then type the command
gbibAutoUpdateOff in the GBiB terminal window.
The auto-update process can be reactivated by typing the command gbibAutoUpdateOn.
Manual updates
As an alternative to the auto-update process, you can manually update GBiB. To do so, start GBiB and
type the command updateBrowser in the GBiB terminal window. This will run the script
that updates the GBiB software and any annotation tracks that you have mirrored. A manual update is
sometimes an effective solution when GBiB is functioning incorrectly or stops working (see the
Troubleshooting section).
Viewing your own data
In addition to providing access to the standard set of Genome Browser annotation tracks generated by UCSC, GBiB allows you to upload your own data in the form of custom annotation tracks. These tracks can be viewed in the Genome Browser alongside the native UCSC tracks.
Uploading your custom annotation tracks to GBiB is similar in many ways to the process used for uploading custom tracks on the public UCSC Genome Browser website. Custom tracks containing smaller data sets can be uploaded to GBiB through the Add Custom Tracks page. For more information on generating and uploading custom tracks, see the Custom Track help page. One big difference, however, is that GBiB has a built-in web server that can communicate directly with your computer. This eliminates the requirement that local big data files be hosted on a separate publicly accessible web server. As a result, your data remains private to your own computer, and will not be available to others unless you grant them access (see Loading local big data tracks and track hubs).
Loading local big data tracks and track hubs
For improved display performance in the Genome Browser, big data sets are typically stored in a compressed, indexed binary file format such as bigBed, bigWig, BAM, or VCF that contains the data at several resolutions. Unlike custom tracks, in which the entire data set is loaded at once, big data files transmit only the data for the region currently displayed. In order to load and display data in one of these formats, the public Genome Browser website requires big data files to be placed on a publicly accessible web server. However, because GBiB acts as its own web server, your computer can share local big data files directly with GBiB for easy uploading as a custom track.
In addition to custom tracks, you can use track hubs and assembly hubs to easily view your data in GBiB. Track hubs are web-accessible directories of genomic data that offer a broader set of configuration and integration options than custom annotation tracks. Assembly hubs are an extension of track hubs and allow you to specify a file containing your novel genomic sequence, in addition to custom annotation data. One strong advantage of track and assembly hubs are that they persist until you delete them, in contrast to custom tracks outside of saved sessions that will automatically expire and be removed from the server after a few days. As with big data tracks, the GBiB built-in web server circumvents the requirement that track and assembly hubs be uploaded to a public accessible server prior to viewing. For more information see Starting a Blat enabled Assembly Hub on GBiB.
Loading local files, such as hubs or big data files, requires that GBiB has access the to local folder containing them. To allow GBiB to access one or more of your local folders, follow these steps:
Step 1. Shut down the GBiB virtual machine (Stopping GBiB)
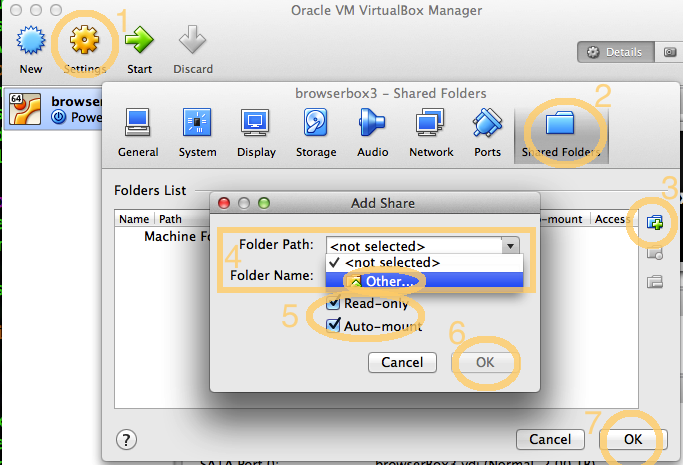
Step 2. Allow VirtualBox access to one or more directories on your hard disk
- Click on the "browserbox" entry in the VirtualBox Manager window, then click Settings.
- Click on Shared Folders.
- Click on the small "+" icon.
- Select a directory on your disk under Folder Path / Other.
- Select the checkbox to give "Read-only" access and make sure the checkbox for "Auto-mount" is selected.
- Confirm by clicking "OK".
- Repeat these steps with other folders, as needed.
- When you are finished, restart GBiB by clicking the "Start" button again.
To check if your folders are shared, type this address into your web browser: http://127.0.0.1:1234/folders. It should show all shared folders. To obtain the bigDataUrl of any of the files in your shared folders, right-click on any file and select "Copy link address". You can now paste this URL into the Add Custom Tracks page. Or, if you are uploading a track or assembly hub, right-click on your "hub.txt" file and select "Copy link address". You can now paste this URL into the box on the "My Hubs" tab of the Track Data Hubs page.
Example: Loading a local BAM custom track
Here is an example of a custom track that loads a local BAM file (to customize this for your own use, replace the URL with a pasted URL from your own machine):
track type=bam name=BamExample bigDataUrl=http://127.0.0.1:1234/folders/test/bamExample.bam Connecting to GBiB with ssh
The GBiB terminal is a normal Linux command line interface. For easier use of the command line, you can connect to the GBiB machine from your computer with ssh. This may offer better speed and more functionality, such as support for copy/paste.
To connect to GBiB with ssh, open a terminal on your computer and type: ssh browser@localhost
-p 1235. You will be prompted for a password when attempting to access GBiB from your
computer's command line. The password is "browser". Alternatively you can use
sudo for root access, which does not require a password. Because stock Windows
computers do not have ssh installed, Windows users will have to use the GBiB terminal or install a
third-party ssh client for Windows, such as the free software Putty.
Data and track conversion tools
By default, GBiB includes a few of the commonly used UCSC file manipulation tools, such as
bedToBigBed, wigToBigWig, samtools and tabix. These tools can be used to convert and manipulate your
basic files into formats that can be uploaded to GBiB as custom tracks. If you need additional
Genome Browser tools, type the following command into the GBiB terminal window:
gbibAddTools. This command downloads and installs the full suite of command line tools
provided by UCSC. Many of these extra tools can be used to extract data and other useful information
from your files, or to convert them between various file types. A complete listing and description
for all of these tools can be found on UCSC's
download
server.
You can use these tools to convert and extract data from your shared files with the standard "Read-only" settings. However, if you would like to to modify files you've shared with your GBiB, you will have to ensure that the "Read-only" access for VirtualBox is turned off. To do so, follow the directions in Step 2 of the Loading local big data tracks section, but deselect the checkbox next to "Read-only".
Please note that the gbibAddTools command requires sudo permissions.
Example: Indexing a local BAM file
A BAM file must be indexed before it can be loaded into the browser. For example, to index a BAM file in a shared folder "Documents" on your hard disk, type:
cd /folders/Documents
samtools index my.sorted.bam Example: Using a format conversion tool
BED files must be converted to bigBed format to be loaded into the browser. For example, to convert a .bed file in a shared folder "Documents" on your hard disk to a .bigBed format file, type:
cd /folders/Documents
fetchChromSizes hg19 > hg19.sizes
bedToBigBed bedExample.txt hg19.sizes myBigBed.bb Example: Loading a GEO File
Some files at external locations, like GEO, are already in binary indexed formats that can be loaded in the browser over the Internet. However, if the server providing these files does not accept byte-range requests, they cannot be transmitted over the Internet to view in the browser. For GEO files, try the ftp location first. If you find the files of interest are giving byte-range request errors, then one option is to download the files and locally load them from your own laptop. With GBiB you can download these files to a local shared folder and then browse them. In the following example the URL of the bigWig (.bw) file was obtained for the wget by right clicking the http link for this GSM1186795 example, that only displays data on chrM and chrX.
ssh browser@localhost -p 1235 (to enter GBiB from your computer terminal, password: browser)
cd /folders
sudo wget
"https://www.ncbi.nlm.nih.gov/geo/download/?acc=GSM1186795&format=file&file=GSM1186795%5FDZ012%5FTRA1%5FN2L3%5Ftr27%5Fce10%5FBTm1x200n%2Ebw" -O GSM1186795.bw
The file can then be found in the GBiB's
http://127.0.0.1:1234/folders/ location,
or loaded with a direct link to the files location:
http://127.0.0.1:1234/cgi-bin/hgTracks?db=hg19&hgt.customText=http://127.0.0.1:1234/folders/GSM1186795.bw&position=chrM(NOTE: In this above example, the ftp location now has byte-range requests supported so the GEO ftp link can be loaded on the browser).
Sharing Genome Browser in a Box with others
By default, GBiB can be accessed only from the machine on which it is installed. This is done to prevent others from accessing your data. You can, however, make your GBiB instance available for use by others. To open up external access to GBiB:
- Shut down the GBiB machine (Stopping GBiB).
- Select the browserbox machine in the VirtualBox left-hand menubar.
- Select Machine >> Settings in the VirtualBox menu to display the Settings window.
- Go to Network >> Adapter 1 >> Advanced >> Port Forwarding.
- Remove the address "127.0.0.1" from "Rule 1" by deleting it with the backspace key.
- Click "OK".
Note: In addition to enabling port forwarding for VirtualBox, you may need to enable the port forwarding functionality on your PC's firewall to allow others to access your GBiB. You will have to search online for instructions on how to enable this functionality for your PC's firewall.
Once you have opened external access to GBiB, your colleagues can access and use your GBiB instance by typing your IP address into their own Internet browser, followed by the :1234 port. Keep in mind that once you have opened up GBiB for remote access, anyone who knows your IP address will be able to access your instance of GBiB and the files that you have shared with it.
If you do not want your colleagues to configure track mirroring in your shared GBiB, you can use
the commands gbibMirrorOff and gbibMirrorOn to disable or enable the
"Mirror Tracks" function in the menu.
User accounts and sessions
The Session tool allows you to take a snapshot of your browser configured with specific track combinations, including custom tracks. A browser session can be saved for future use or shared with others who use your GBiB instance.
To use the Session tool, you must first create a user account. User accounts and sessions on GBiB are separate from those maintained on the UCSC Genome Browser public website. Because of this, user names and sessions that you create on GBiB cannot be used with the main UCSC Genome Browser website, and vice versa. More information on creating a user account and creating, saving, and sharing sessions can be found in the Sessions User's Guide.
Username recovery on accounts is not supported at this time; however, you can recover a lost password. The system for recovering lost passwords on GBiB is much different from that on the Genome Browser and requires access to the command line. To recover a lost password:
- Navigate to the account login page.
- Click on the "Can't access your account?" link on the login page.
- Select the "I forgot my password. Send me a new one." option and enter your username.
- An email message will be sent to the Alpine email client included with VirtualBox.
- To access the email client, click on the GBiB terminal window.
-
In this window, type
mailand press "enter", which will bring up the Alpine email client. -
Select
MESSAGE INDEXfrom the menu and press enter. - Select the message with "New temporary password..." in the subject line.
- Log in using your username and this temporary password.
- After logging in, you will be prompted to create a new password.
- Once you are finished, exit the Alpine email client by pressing "Q" and then "Y".
Please be aware that anyone with access to your username and the command line interface of your GBiB can change your password.
Troubleshooting common problems
This section addresses some common errors and problems that you may encounter while setting up and installing GBiB. It is not intended as a comprehensive list. If you experience a problem not listed below, please email the UCSC Genome Browser public support mailing list at genome@soe.ucsc.edu. Note that messages sent to this address are publicly accessible.
VirtualBox Error: "VT-x/AMD-V hardware acceleration has been enabled, but is not operational. Your 64-bit guest will fail to detect a 64-bit CPU and will not be able to boot."
Solution 1: Some older entry-level laptops from around 2009-2011 (e.g. Toshiba Satellite U500) were sold with CPUs that do not support virtualization. These laptops cannot run GBiB. The same applies to low-cost laptops ("netbooks") with Intel Atom processors.
Solution 2: On some hardware, virtualization is supported but deactivated in the BIOS. Here is one example of how virtualization support is activated on some hardware. Note that your BIOS virtualization options may differ from those described here.
- Reboot the computer and press F12 during boot to show the BIOS menu.
- Go to BIOS Setup >> Virtualization Support >> Virtualization and check "Enable Intel Virtualization Technology". On some Dell systems, you may need to enable additional virtualization options under the BIOS Setup. Go to Virtualization Support >> Virtualization for Direct I/O and check "Enable Virtualization for Direct I/O".
- Exit and save, then restart the computer.
VirtualBox Error: "Failed to open virtual machine located in... Trying to open a VM config ... which has the same UUID as an existing virtual machine."
Solution: This error occurs if GBiB has been previously downloaded and installed. To resolve this problem:
- Start VirtualBox.
- Select the currently installed version of browserbox from the left-hand column.
- Select Machine >> Remove (Ctrl+R or ⌘+R) in the VirtualBox menu. When asked, choose "Remove only" to retain the old browserbox version on your disk.
- Double-click the newly downloaded browserbox.vbox file or add it with the Machine >> Add menu option.
VirtualBox Error: "Failed to open virtual machine located in... Cannot register the hard disk ... because a hard disk ... already exists."
Solution: This error occurs if GBiB has been previously downloaded and installed. To resolve this problem:
- Start VirtualBox.
- Select File >> Virtual Media Manager (Ctrl+D or ⌘+D) in the VirtualBox menubar.
- Select gbib-data.vdi and click "Remove".
- Double-click the newly downloaded browserbox.vbox file or add it with Machine >> Add menu option.
Genome Browser Error: "Couldn't connect to database hg19 on genome-mysql.soe.ucsc.edu as genomep."
Solution 1: This indicates that the virtual machine could not connect to the UCSC MySQL
server. This error can be caused by a change of the IP address (e.g. on a wifi connection) that has
not yet been picked up by the virtual machine. In this situation, you can restart the box or run
the command sudo ifup --force eth0 to reset the network connection.
Solution 2: Alternatively, this error may be generated when the firewall does not allow outgoing TCP data on port 3306/MySQL. In this case, contact your institution's IT support staff to inquire about ways to open this port.
Genome Browser Error: "Couldn't connect to database hgcentral on localhost as root. Can't connect to local MySQL server through socket '/var/lib/mysql/mysql.sock' (13)"
Solution: This error can be caused when the virtual machine is downloading data such as when using the mirror tool to install local copies of tracks to increase speed and performance. Once the download finishes, the message will no longer appear. If one cancels a download in progress, the error can persist, in which case restart your virtual machine and the message should be removed.
Problem: Error when using BLAT.
When you use BLAT on your GBiB machine, it attempts to open outgoing TCP connections to the BLAT servers running at UCSC. Each assembly has two ports that need to be open from your GBiB machine to the UCSC BLAT servers. You will likely need to contact the system administrators at your institution and ask them to open outgoing TCP connections to a list of UCSC hostnames and ports. The commands below will allow you to find out the names of these hosts and ports.
Solution: To find the hostname-port combination to open from your GBiB machine, use this Mysql query:
mysql hgcentral -e 'select * from blatServers where db="YOURDB"'For example, if you want to enable BLAT for hg19 and hg38, you can issue this command:
mysql hgcentral -e 'select * from blatServers where db="hg38" or db="hg19"'+------+---------------------+-------+---------+--------+
| db | host | port | isTrans | canPcr |
+------+---------------------+-------+---------+--------+
| hg19 | blat4a.soe.ucsc.edu | 17779 | 0 | 1 |
| hg19 | blat4a.soe.ucsc.edu | 17778 | 1 | 0 |
| hg38 | blat4c.soe.ucsc.edu | 17781 | 0 | 1 |
| hg38 | blat4c.soe.ucsc.edu | 17780 | 1 | 0 |
+------+---------------------+-------+---------+--------+Problem: GBiB is functioning incorrectly or stops working.
Solution 1: If you have previously turned off automatic updates, your software or data may need updating. Try manually updating GBiB. This update process may take several hours over a slow Internet connection.
Solution 2: Re-download the gbib.zip file and extract only the file gbib-root.vdi. Place this file in the same directory with the files extracted from your original GBiB installation. Do not extract and overwrite gbib-data.vdi -- it contains your personal track and session settings and mirrored tracks.
Problem: I need proxy support for my files to load.
Solution: Proxy servers may be required by some installations to get through a firewall.
You can add the settings httpProxy, httpsProxy and ftpProxy to hg.conf.local at
/usr/local/apache/cgi-bin/hg.conf.local:
httpProxy=http://someProxyServer:3128httpsProxy=http://someProxyServer:3128ftpProxy=ftp://127.0.0.1:2121If the proxy server requires BASIC authentication, then the line in hg.conf.local should look like this:
httpProxy=http://user:password@someProxyServer:3128httpsProxy=http://user:password@someProxyServer:3128
If there are domains or domain-suffices that should not be proxied, use noProxy.
noProxy=ucsc.edu,mit.edu,localhost,127.0.0.1
The file /usr/local/apache/cgi-bin/hg.conf should already include a line like include
hg.conf.local to incorporate the changes in hg.conf.local.
Problem: "No space left on device" error when running gbibAddTools.
In older GBiB's, there is an error in the gbibAddTools command. To fix this command,
edit the /home/browser/.bashrc file and change the following line:
alias gbibAddTools='mkdir ~/bin -p; rsync -avP hgdownload.soe.ucsc.edu::genome/admin/exe/linux.x86_64/ ~/bin/'to either of the follwing lines:
alias gbibAddTools='sudo mkdir -p /data/tools; sudo rsync -avP hgdownload.soe.ucsc.edu::genome/admin/exe/linux.x86_64/ /data/tools/ && ln -s /data/tools ~/bin'alias gbibAddTools='sudo mkdir -p /data/tools; sudo rsync -avP hgdownload-euro.soe.ucsc.edu::genome/admin/exe/linux.x86_64/ /data/tools/ && ln -s /data/tools ~/bin'The updated commands will install the tools to a location with more disk space available using either the North American or European hgdownload servers.
Genome Browser in a Box commands
In addition to normal Linux commands, GBiB defines some special commands you may use while inside the GBiB terminal's window. These additional commands are documented in the README.txt file on the GBiB terminal's home directory, which can also be accessed via ssh.
General commands
gbibAutoUpdateOff |
Switch off automatic weekly updates |
gbibAutoUpdateOn |
Reactivate automatic weekly updates |
gbibOffline |
Switch off remote access to UCSC for tables or files |
gbibOnline |
Reactivate remote access to UCSC for tables or files |
gbibMirrorTracksOff |
Disable the "Mirror tracks" tool |
gbibMirrorTracksOn |
Enable the "Mirror tracks" tool |
gbibAddTools |
Download the UCSC genome command line tools into the ~bin directory. Requires sudo permissions |
Advanced commands
gbibCoreUpdate
| Download the most current update script from UCSC now, this is part of an automatic update |
gbibFixMysql1 |
Fix all mysql databases, fast version |
gbibFixMysql2 |
Fix all mysql databases, intensive version |
gbibResetNetwork |
Reinit the eth0 network interface, in case VirtualBox dropped the network connection |
gbibUcscLog |
Show a real-time log of all MySQL queries on the console |
gbibUcscTablesLog |
Show the tables that had to be loaded through the internet from UCSC |
gbibUcscTablesReset |
Reset the table counters |
gbibUcscGbdbLog |
Show the gbdb files that had to be loaded through the internet from UCSC |
gbibUcscGbdbReset |
Reset the gbdb counters |
Licensing information
GBiB is free for non-profit academic research and for personal use. Corporate use requires a license, setup fee and annual payment. To purchase a license or download the GBiB, visit the Genome Browser store.
[an error occurred while processing this directive]